Your First DIC Experiment with EikoTwin: Setup Tips for Altair Users
As a user of the Altair Partner Alliance, you have free access to EikoTwin DIC — a powerful tool for full-field strain and displacement measurement through Digital Image Correlation (DIC). But while the software is directly accessible, many users hesitate to take the first step simply because they don’t have a dedicated experimental setup at hand.
The good news? You don’t need a full lab to get started. In fact, with a decent camera, some basic lighting, and a bit of preparation, you can already perform a simple DIC test that lets you understand the workflow, validate your setup, and explore how experimental data can be used to enrich your Altair simulation models.
This guide walks you through your first DIC experiment using accessible tools and best practices: camera and lighting setup, speckle pattern application, image capture, and basic correlation. We’ve also included short videos at key steps to help you get started faster.
Whether you’re validating a bending simulation or just exploring what DIC can do, this article is your entry point.
Note: don’t miss our EikoTwin DIC videos on the Altair Learning Center, and feel free to contact if you need any technical advice.
What You Need: Equipment Overview
Before diving into your first experiment, let’s clarify what kind of equipment is actually required for DIC — and more importantly, what you can do with tools you might already have on hand.
Cameras
You don’t need high-end industrial cameras to start. Many users begin with what they already own:
- DSLR or mirrorless cameras: Ideal if they allow manual control over focus, exposure, and aperture.
- Scientific or industrial cameras: Great if available, especially for stereo setups or synchronized acquisition. High-speed cameras can be used as well and often have great sensors, even though the resolution is worse.
- Smartphones: Usable for basic 2D testing, though limited in control and optical stability. Keep in mind they usually have lots of distorsions in their optics and should not used for measurements after a trial period.
✅ Minimum requirements:
- Stable mounting (no handheld shots)
- Sufficient resolution (ideally >5MP)
- Manual exposure and focus settings
If you’re planning to try stereo DIC later, using two identical cameras is highly recommended for better calibration.
Lenses
- Prefer lenses with manual focus and fixed focal length (prime lenses) for daily use; variable focal length is perfectly acceptable for first tests.
- Avoid lenses with (or deactivate) autofocus — it often introduces unwanted variation between images.
- Choose focal lengths based on your field of view: 25–50 mm works well for mid-sized objects (10–50 cm wide).
Mounting
- Use tripods or lab-grade camera stands.
- The key is rigidity: cameras must not move between reference and deformed images.
- For stereo: fix both cameras securely on a shared rig with adjustable orientation.
Light It Right: Illumination Tips
Good lighting is just as important as good cameras when it comes to Digital Image Correlation. Without proper illumination, even the best speckle pattern won’t produce reliable results.
What You’re Aiming For
- Uniformity: The surface should be evenly lit — no bright spots or dark zones.
- Diffuse light: Harsh directional light creates reflections and shadows, which confuse the correlation algorithm.
- Consistency: Lighting must remain stable during the entire image sequence.
❗ DIC doesn’t work well with changing light or flickering sources (e.g., fluorescent lights without ballasts).
Light Sources That Work
- LED panels or photo/video lights: A great choice if you have them — especially models with adjustable intensity and color temperature.
- Desk/workshop lamps: Can work for small parts, if combined with a diffuser (e.g., white paper or tracing paper).
- Natural daylight: Possible, but not ideal — clouds and movement can cause light variation between images.
For larger objects or high-speed acquisition, more powerful lights may be required to ensure a good exposure time (avoid motion blur and flicker).
Avoid These Lighting Mistakes
- Shiny surfaces without matting (see the next section on speckling)
- Spotlights that cast hard shadows
- Mixed color temperatures (e.g., combining daylight and tungsten bulbs)
Applying the Speckle Pattern
The speckle pattern is at the heart of DIC: it’s what allows the software to track surface displacements with sub-pixel accuracy. A poor pattern means poor results — even with a perfect camera and lighting setup.
What Makes a Good Pattern?
A good speckle pattern must be:
- High contrast: Black on white (or the reverse) works best.
- Random: No repeated shapes or structures.
- Well-sized: Speckles should be 3–5 pixels wide in the image. Too small = noise, too large = low resolution. If you need help, we have a dedicated spreadsheet to help you calculate what it means in terms of millimeters.
- Well distributed: Avoid large blank areas or overly dense clusters.
🧠 Think of the pattern like a fingerprint for the surface — it has to be unique and easy to track.
To learn more, EikoSim recommends reading the Good Practices Guide for DIC: a great reference by the International DIC Society.
How to Apply It
- Spray paint: The most common and versatile method. Use white base paint and a quick black mist for speckles. It takes some time to get good – practice on cardboard before you speckle your sample !
- Stamps or sponges: Useful for small parts or if you want more control over speckle size.
- Digital printout: For flat samples only — ensure it’s firmly attached and doesn’t move.
- Marker pens: Can work for small tests, but hard to keep random.
How to Check If It’s Good
Zoom into the image: speckles should be sharp and random, with a balanced black/white ratio (ideally ~50/50). You should also be able to check that the spots are at least 3-5 pixels and not wider than 10-15 pixels.
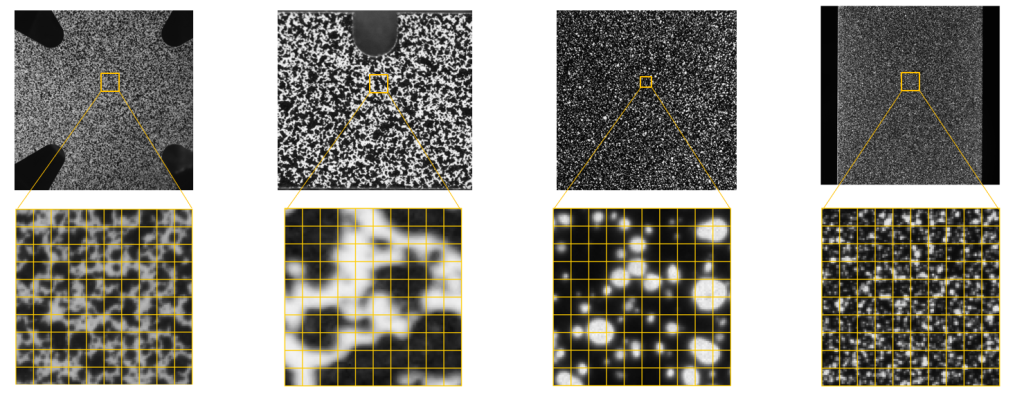
Compromise between speckle size and resolution : the ideal situation is speckle pattern number 1. Number 2 and 3 are too sparse/big speckle dots and number 4 is too thin.
Setup and Focus: Preparing the Test Scene
Once your cameras, lighting, and pattern are ready, it’s time to prepare the physical test setup. This step is often underestimated, but it’s critical to obtaining clean and usable images for correlation.
Focus and Depth of Field
- Use manual focus: Autofocus may shift between frames — lock the focus before capturing.
- Close the aperture (f/8 to f/11): This increases depth of field, making more of the object appear sharp.
- Check sharpness on the speckle pattern — not on the background or edges.
🔍 If the pattern looks soft or blurry when zoomed in, correlation accuracy will drop.
Field of View and Framing
- Make sure the entire area of interest is visible in all frames.
- Leave a small margin around the region of interest (ROI) to avoid edge effects.
- Avoid zooming too tightly — parts of the sample might move out of view during deformation.
Rigid Mounting and Scene Stability
- Fix your specimen securely: no movement of the test piece relative to the background or the camera.
- Avoid vibrations, especially if you’re using long exposure times.
- Use the same setup from reference (undeformed) to final (deformed) image — any shift in camera position invalidates the test.
2D or Stereo? Choosing Your First Approach
Before capturing images, you need to decide whether you’ll run a 2D or stereo (3D) DIC measurement. Both are supported in EikoTwin DIC, but they come with different requirements and capabilities.
2D DIC: Simple and Efficient
- One camera, viewing the surface perpendicularly.
- Assumes the surface stays in-plane (no significant out-of-plane motion or rotation).
- Easier to set up and ideal for:
- Tensile or bending tests on flat specimens
- First-time DIC users
- Educational or exploratory use
- Tensile or bending tests on flat specimens
Pros:
- Minimal hardware required
- Fast to set up and post-process
Limitations:
- Inaccurate if the surface moves out of plane
- Sensitive to perspective distortion (camera must be perfectly aligned)
🧪 A good first test? A 3-point bending or uniaxial tensile test with a flat, speckled sample.
Stereo DIC: Full 3D Measurement
- Requires two cameras with overlapping views.
- Measures 3D displacements and strains, including out-of-plane motions.
- Suitable for:
- Complex geometries or curved parts
- Large deformations or rotations
- More advanced validation projects
- Complex geometries or curved parts
Pros:
- Full 3D shape, displacement, and strain fields
- Handles complex motions
Limitations:
- Always requires camera calibration (included in EikoTwin DIC)
- Needs a stable stereo rig and synchronized image acquisition
Recommendation for First-Time Users
Start with 2D DIC unless your application clearly involves 3D motion. It’s easier to implement, helps you understand the workflow, and already provides valuable insights when used properly.
Need to perform a 3D DIC measurement? Make sure you check out this video on how to acquire calibration target images properly.
With your setup in place, it’s time to capture your first image series and start analyzing with EikoTwin DIC. This section gives you a basic workflow to follow for reliable results.
Image Capture: What to Record
- Always start with a reference image of the undeformed state. If you want (you should) to calculate measurement uncertainties with the noise floor technique in EikoTwin DIC, take a series of 30 to 50 images without motion and put them in a separate folder.
- Then record one or more images under load or deformation.
- For slow or quasi-static tests:
- Take images manually or at regular intervals.
- Take images manually or at regular intervals.
- For dynamic tests:
- Use a high-speed camera or synchronized trigger.
- Make sure light intensity is high enough to avoid motion blur.
- Use a high-speed camera or synchronized trigger.
🧠 Avoid compressing or modifying the images. Save in a lossless format (TIFF, PNG, or high-quality JPEG).
File Organization Tips
- Use descriptive filenames (e.g., ref.png, load1.png, load2.png).
- Group images from each camera in separate folders for stereo.
- Make sure all images are the same resolution and orientation.
Import into EikoTwin DIC
- Start a new project
- Import images: reference + deformed states.
- If stereo: perform the calibration step using a calibration target or known geometry.
- Apply the correlation: EikoTwin will compute displacement fields from the speckle motion.
- Visualize and export: strain maps, displacement vectors, ROI statistics.
First use? Learn about the basics of EikoTwin DIC in this demo video:
What a First Test Can Tell You
Even with a basic setup, your first DIC experiment can already provide meaningful insights — and a solid foundation for connecting test data with your simulation models.
What You Can Extract
- Displacement fields: How your sample moves under load, in 2D or 3D.
- Strain fields: Local strain concentrations, gradients, and deformation modes.
- Quantitative validation data: Use EikoTwin to extract values at specific points or regions to compare with your Altair simulations.
📊 Seeing how your sample actually behaves under load helps build confidence in your model — and spot modeling assumptions that might not hold.
What You’ll Learn
- Whether your speckle pattern and lighting are good enough.
- How the DIC workflow integrates into your simulation process.
- What kind of test setup you’ll need for more advanced studies (fatigue, dynamics, complex geometries…).
🔁 Your first test is not just a measurement — it’s a feedback loop. Each step helps refine your setup for the next.
Conclusion: Try, Learn, Validate
You don’t need a full lab to get started with Digital Image Correlation. With a decent camera, stable setup, and the right guidance, your first EikoTwin DIC experiment can already provide valuable, full-field data — and help you take the first step toward simulation validation and test-data fusion.
If you’re an Altair user, this is the perfect way to explore the potential of combining test and simulation.
👉 Ready to try?
- Check our Youtube Channel or our blog for more info
- Use our starter checklist PDF or the manual (accessible from the Help section in EikoTwin DIC)
Or reach out for help from the EikoSim team!
98-100 AVENUE ARISTIDE BRIAND
92120 MONTROUGE
FRANCE