Crack tracking on a structure : practical use case in thermal fatigue @ Liebherr Aerospace
In the aerospace industry, where component reliability is critical, the study and tracking of cracks is of paramount importance. Liebherr Aerospace, a leading manufacturer of heat exchangers, sought EikoSim’s expertise for an in-depth study of crack development under extreme thermal fatigue loading. The study, detailed below, provides a comprehensive overview of the methods, results and conclusions drawn from this collaboration.
Problem: crack detection and monitoring on a fatigue structure
The main objective was to track the propagation of existing cracks and detect any new emerging cracks. In addition, it was crucial to obtain sufficiently resolved displacement and strain fields at each thermal cycle, in order to better understand the exchanger’s behavior under repeated thermal loading.
Method: Digital Image Correlation instrumentation
The study began with thermal stress tests on the exchanger, with temperature cycles ranging from 20°C to 600°C. Instrumentation included the use of digital image stereo-correlation (DIC) using two two-camera systems, to target two critical areas of the exchanger in which cracks may appear.
Virtual preparation of the instrumentation
The implementation of the instrumentation system was prepared with precision, taking into account the optimum positioning of the cameras for optimal capture of the deformations. A camera layout plan was prepared virtually using EikoTwin Virtual software, to ensure that the procedure was feasible in the congested areas of the test frame. This process included checking the field of view, the volume of sharpness, the quality of camera calibration, as well as estimating measurement accuracy and associated uncertainties. To this end, virtual images were generated using finite element meshing and numerical simulation of the heat exchanger, then analyzed with EikoTwin DIC image correlation software.
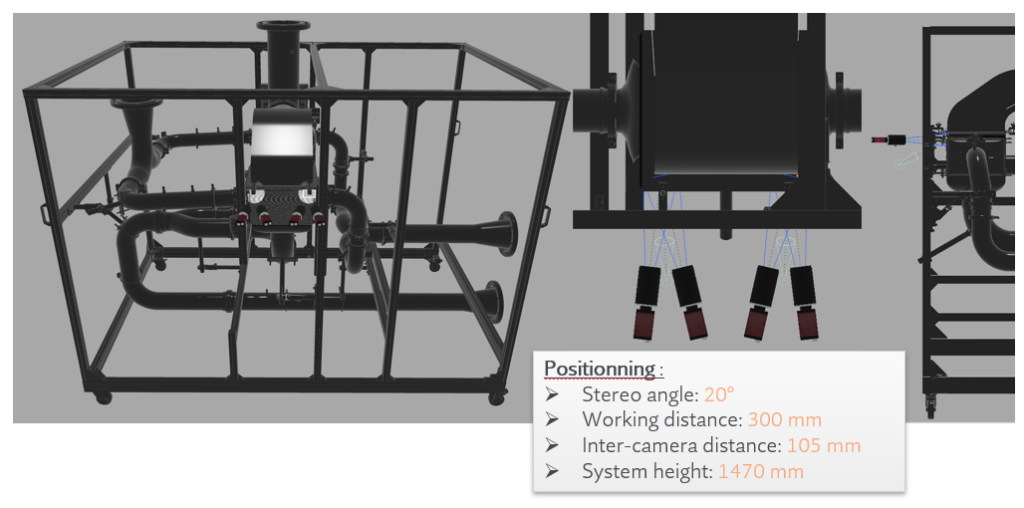
The experimental setup consisted of high-resolution cameras and powerful, uniform lighting, positioned to avoid reflections. The lighting had to be sufficiently powerful to ensure that external lighting did not influence the brightness of the images, given that the test would take place over several hundred hours, during which the ambient lighting could vary.
Implementation
In addition, a speckle coating was applied to the part to enable deformations to be measured during image correlation. To ensure accurate measurement of deformations by digital image correlation (DIC), it is essential to apply a random, contrasting texture, known as speckle, to the part. This texture was applied to the surface of the exchanger using a special filter and high-temperature resistant thermal paint. The measurement area, measuring just 50 x 50 mm and requiring a high spatial resolution of around 1 mm corresponding to the size of the finite element mesh elements, meant that the speckle spot size had to be between 0.1 mm and 0.2 mm.
During the test, the cameras were synchronized with the temperature control machine, and images were acquired at each stage of the thermal cycle over several thousand cycles, enabling continuous monitoring of the exchanger’s behavior. However, the test presented significant challenges, not least because of the heat haze generated by high temperatures, an optical phenomenon due to the deflection of light beams, likely to induce biases in the measurement of displacements. To overcome this problem, an air gap was installed, positioned so as to shave the exchanger wall, which considerably reduced the impact of the haze.
The reliability of measurements obtained by image stereo-correlation relies on meticulous camera calibration. This involves determining the focal lengths, positions and orientations of the cameras, initially using the markings made on the part and the finite element model, then using the speckle texture to finalize the calculation. This calibration was carried out under ambient conditions prior to the start of thermal testing.
EikoTwin DIC software was used to process the captured images. This digital image correlation software is used to calibrate the cameras and track displacements and deformations on the exchanger structure by analyzing the differences between images captured at different stages of the thermal cycles.
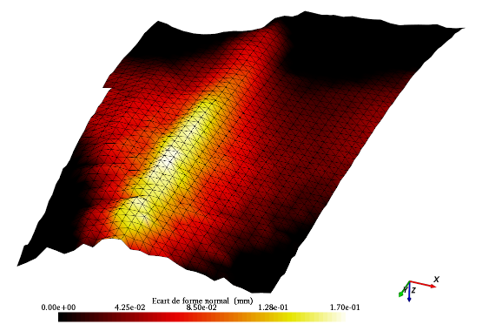
After finalizing camera calibration, the software uses the stereovision system to identify a shape deviation between the nominal geometry and that observed in a measurement zone. This measured deviation is characteristic of the exchanger’s internal (welded) structure.
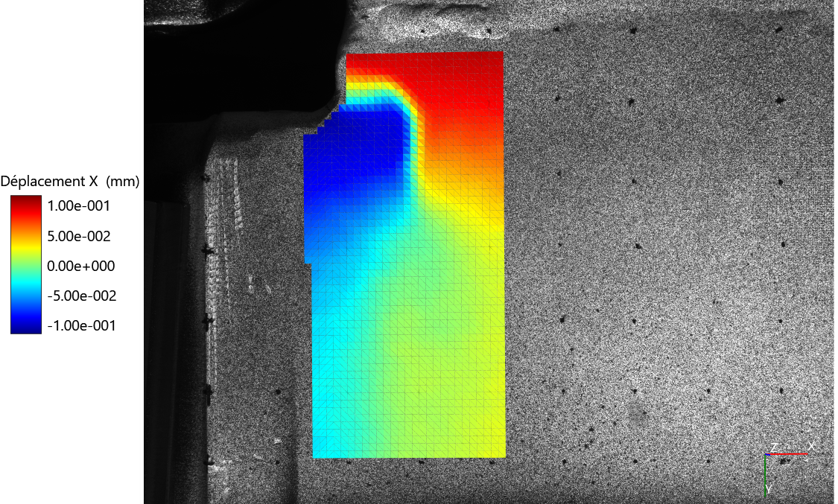
The first displacement measurement on a cracked exchanger revealed that the existing crack was clearly identifiable on the displacement fields, characterized by a significant gradient from negative to positive displacement. This monitoring confirmed the progression of existing cracks over thermal cycles. Data analysis also revealed high strains at the elements where the existing cracks were located, confirming the localization of deformation around these critical zones.
Results: Rapid crack localization
As regards the measurement zone which initially showed no cracks, although no new cracks were detected, a diffuse concentration of deformation was measured at a position similar to that where cracks tend to appear. This area could potentially become the site of a new crack and should therefore be carefully monitored.
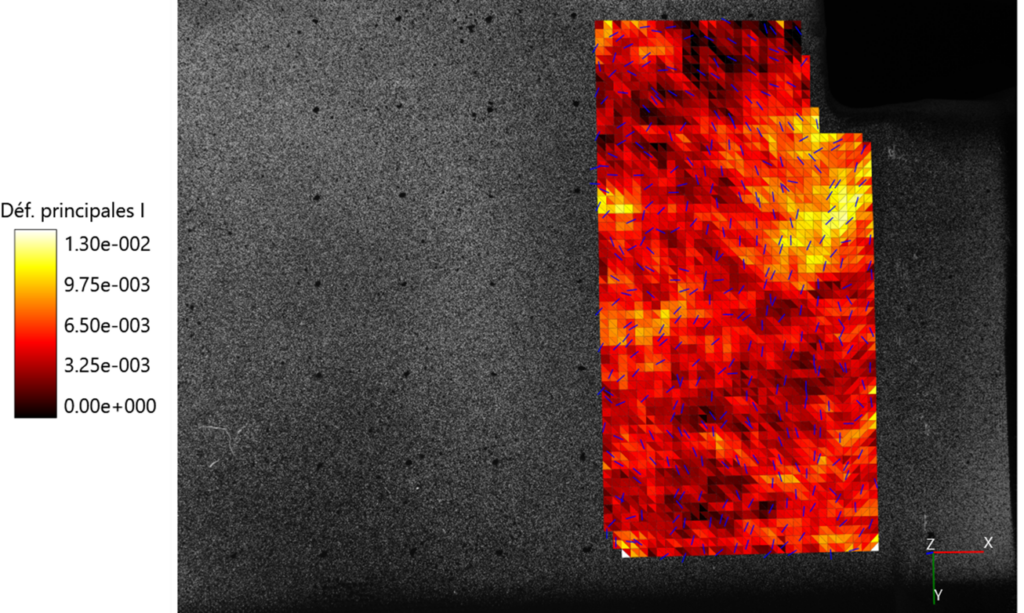
Nevertheless, the finest observation was achieved using image correlation residuals, which enabled pixel-level (20 µm) observation of the cracks. Analysis on virtual extensometers enabled us to quantify the evolution of openings for different propagation regimes: formation, widening and stabilization of the crack opening.
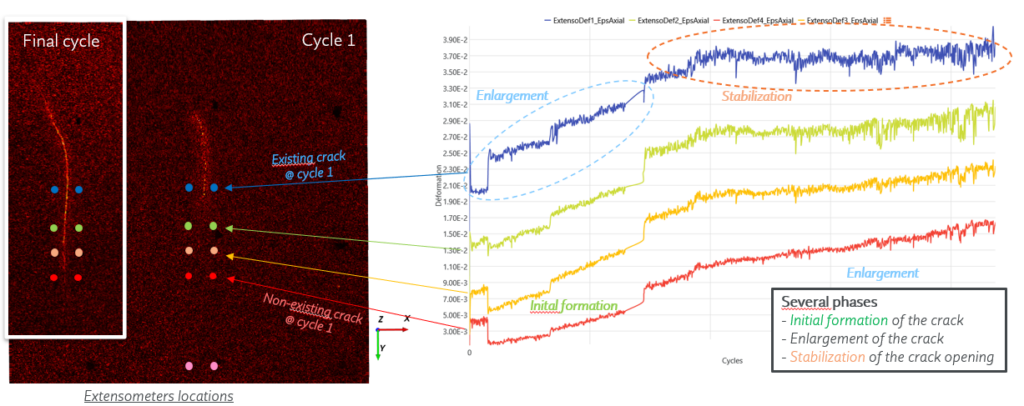
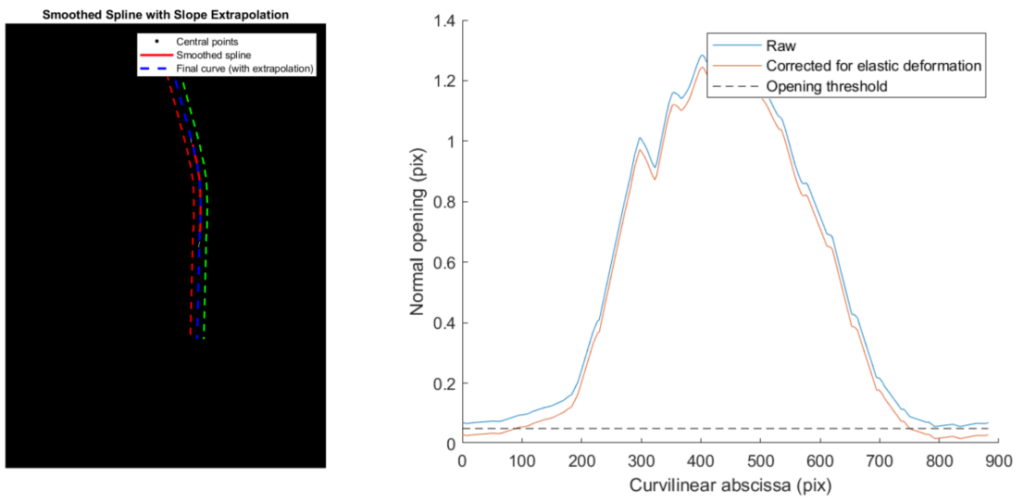
In addition, this residual zone can be used to automate crack tracking, thanks to dedicated post-processing of the opening measured by image correlation along the crack. Post-processing of this kind at each stage enables crack tracking over time.
In conclusion, this comprehensive study has demonstrated the effectiveness of digital image stereo-correlation in accurately tracking crack propagation during thermal fatigue loading. The ability to accurately detect and track existing cracks offers significant prospects for improving component reliability in demanding thermal environments. No new cracks were detected during the study. Prospects for this work include the continuation of crack tracking over a larger number of cycles in order to analyze the behavior of the enclosure in the face of new crack formation. In addition, it would be interesting to examine the deformation threshold at which new cracks could appear, thus enabling a better understanding of failure mechanisms under repeated thermal loading. Finally, this proof of concept has enabled the Liebherr teams to gain a better understanding of the possibilities and constraints associated with the use of image correlation systems, and to project themselves into future autonomous use.
