Design and validation of laser impact tests
- By Clara Minguet, Research engineer at EikoSim
ALPhANOV, an optics and lasers technology center based in Talence since 2007, and MBDA, the European leader in the Defence sector, have had a joint laboratory since 2019 for laser-matter interaction comprised of a cabin equipped with a high-power infra-red source.
Thanks to a flexible and durable architecture, complex experiments, quickly reconfigurable, highly instrumented, and safe for staff are carried out there. A security automaton continuously monitors the status of the cabin and critical sensors and authorizes or not the shot, whereas a second one controls the laser, a robot, and an optical head. An ALPhANOV HMI is used to program the test procedure.
The instrumentation, including infrared and visible high-speed cameras and pyrometers, is synchronized on the same clock signal. Finally, all recorded video and analog data are replayed in the same interface.
This study, carried out by EikoSim in collaboration with MBDA, ALPhANOV, and the Laboratory of Mechanics and Technology (ENS Paris-Saclay), concerns steel sheets subjected to laser shots in their center in the laser cabin. The aim is to quantify the thermomechanical effects undergone by the sheets thanks to the measurement of displacement fields by digital image correlation.
Digital pre-study
Designing tests instrumented with imaging techniques in a complex experimental environment is challenging. Indeed, when studying a part in a confined and congested space such as the laser cabin, it is difficult to anticipate the ideal camera position that ensures the studied area’s visibility during the test.
The use of Blender makes it possible to overcome this issue. Blender is an open-source 3D computer graphics software mainly used in film. It allows creating a scene in which the user can choose the positioning of the cameras around the studied part and can then generate images of the reference configuration and distorted configurations using the results of preliminary numerical simulations.
These images can then be processed with image correlation software to estimate the metrological performance (in terms of measurement uncertainties) that the user of this software will be entitled to expect under these ideal conditions.
For this study, 4 cameras are positioned in the Blender scene, with the limited space of the laser cabin in mind. Moreover, to avoid being damaged, they must not be in the path of the laser beam, impacting almost horizontally the center of the sheet. A view from below is therefore adopted (see Figure 1).
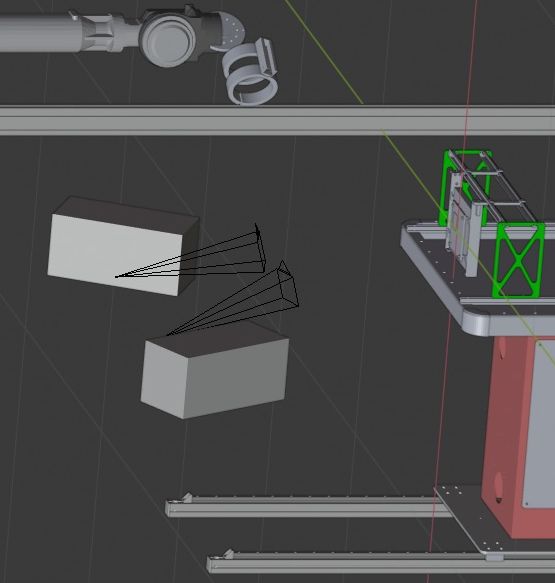
The post-processing of the ideal images generated by Blender with the EikoTwin DIC software makes it possible to estimate, for this particular case, a displacement measurement uncertainty of about 5 µm for the in-plane components and 15 µm for the out-of-plane component.
Setting up the test
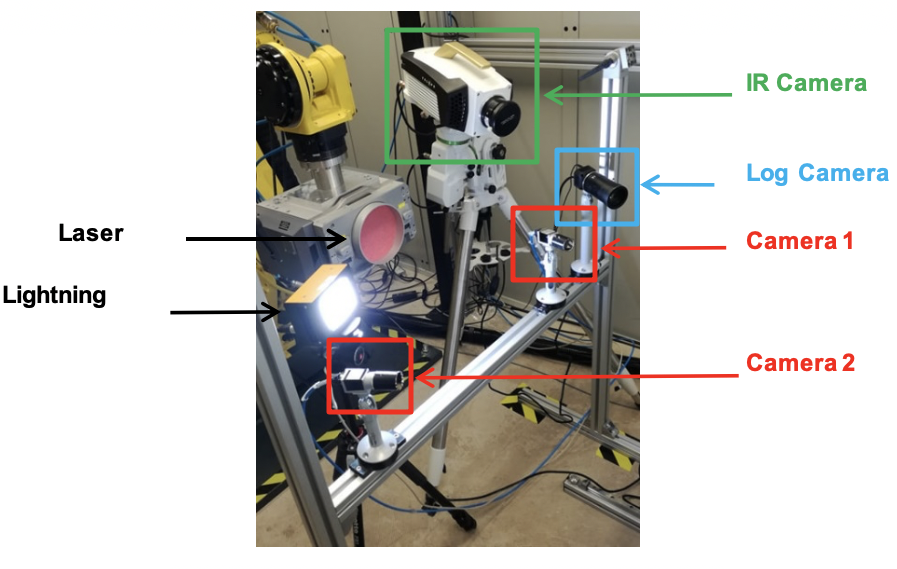
The tests are instrumented with a stereovision device with two digital cameras, complemented by an IR camera and a logarithmic response camera loaned by NIT. ALPhANOV placed them in the positions determined during the pre-study by EikoSim (see Figure 2) and prepared the experimental environment in about one day.
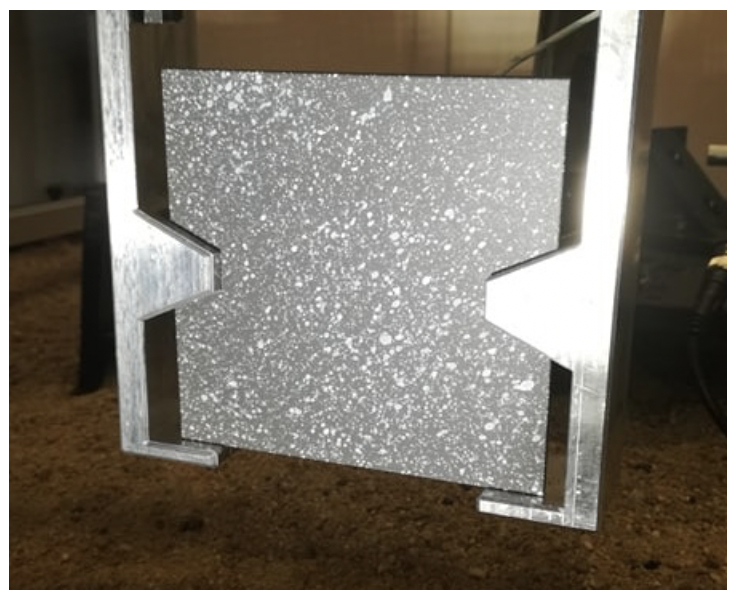
During the test campaign, more than 10 laser shots were performed in a day and a half on previously speckled sheets to create sufficient contrast for digital image correlation (see Figure 3).
Two processes for creating a speckle pattern, with topology provided by EikoSim, were carried out: conventional (by painting) and innovative (by laser nanotexturation of the impacted surface, ALPhANOV process).
Stereo-correlation measurement results
Uncertainties quantification
To estimate the uncertainty during the test, a displacement measurement was performed on a set of 30 images at rest before each shot. The effect of the acquisition noise on the expected (zero) displacement for these images can thus be measured.
Whatever the direction, the uncertainty levels are very close to the estimate made during the pre-study.
Displacement fields
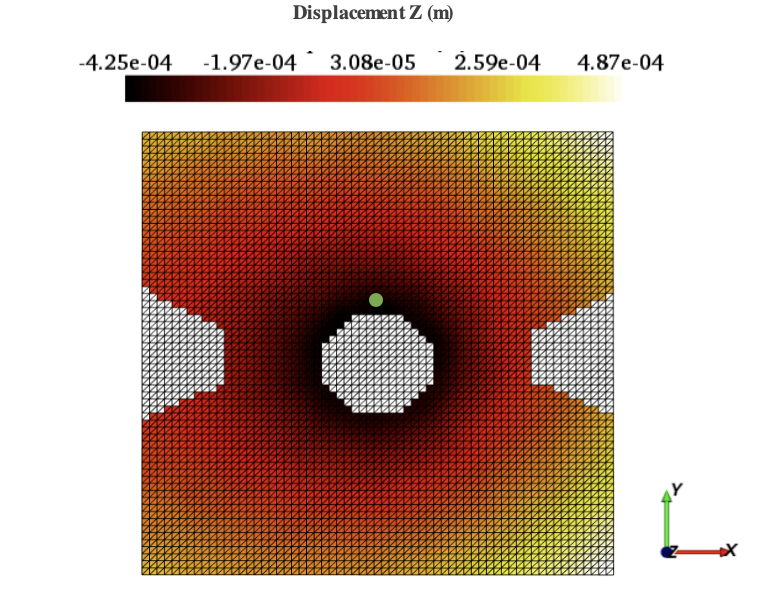
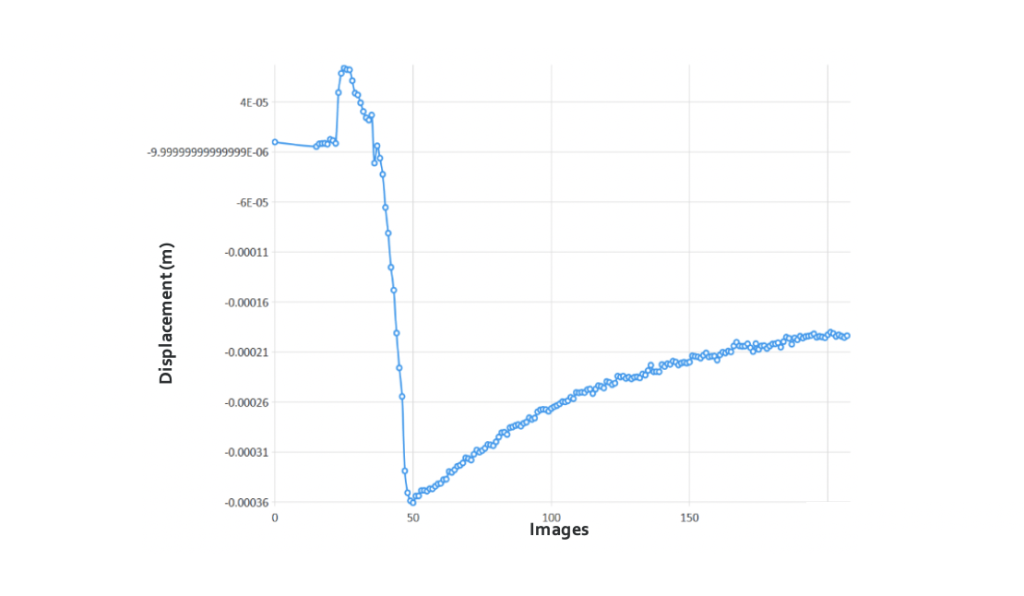
Digital image stereo-correlation allows for non-contact measurement of the 3D surface displacement fields of the part from the images taken during tests by the two digital cameras. This technique is based on the assumption of grey level conservation in images. The measured fields are expressed directly on the 3D surface model used for the finite element simulation. The measurement analysis shows a 3-step distortion of the sheet:
- after laser activation, the sheet in the impact area swells in the laser direction.
- then the sheet in the impact area swells in the opposite direction to the laser (see Figure 4).
- after laser deactivation, the sheet partially returns to its original position as it cools down.
Digital image correlation provides access to displacements at any point on the measurement mesh as a function of time.
By positioning a numerical displacement sensor at a point of the sheet mesh (see Figure 4), the observed behaviour on the displacement fields is confirmed (see Figure 5).
Lessons
This work has demonstrated the feasibility of an experimental digital image correlation approach with encouraging results.
They are only the first step in the exploration of the interpretation of power laser-matter interaction phenomena by digital image correlation.
Redactors: C.Minguet, F.Mathieu – EikoSim ; E.Chalumeau – ALPhANOV ; F.Hild – Université Paris-Saclay, ENS Paris-Saclay, CNRS ; R.Peiffer, S.Carpier – MBDA
You can also find this article in the May issue of the Essais & Simulations magazine (n°141) !
NB : the broadcasting of the videos initially planned has finally not been authorised by our partner
